Preamble
I apologize for how long this post will be, but I intend to be as comprehensive and objective as possible about my experience. If this is a 'TLDR' for you, I suggest you head to the summary at the end.
If you've googled an issue you're having with your own assembly and stumbled across this, try and search the page for your issue, if you need further help you could try posting to the Ormerod 2 RepRap Forum (People there are Very helpful, and some are experts in related fields), Commenting on the article (I may or may not be able to help), or contacting RepRapPro Support.
Introduction
I've deliberately delayed posting anything about my Ormerod 2 assembly experience, until I'd had it up and running, and had a few successful prints. I wanted to be able to give an objective viewpoint, with all the benefits of hindsight and time to prevent any 'rage' or 'flame' posting in the heat of the moment. I also wanted to be able to report how RepRapPro's technical support was if I ran into any trouble (and boy did I!), I thought it would be unfair to the company to post anything without allowing them time to respond, assist, and correct whatever issues arise.
As you might have guessed by the long delay between my first post and this post, I did indeed run into difficulties during the assembly and commissioning, which I will cover in more detail below.
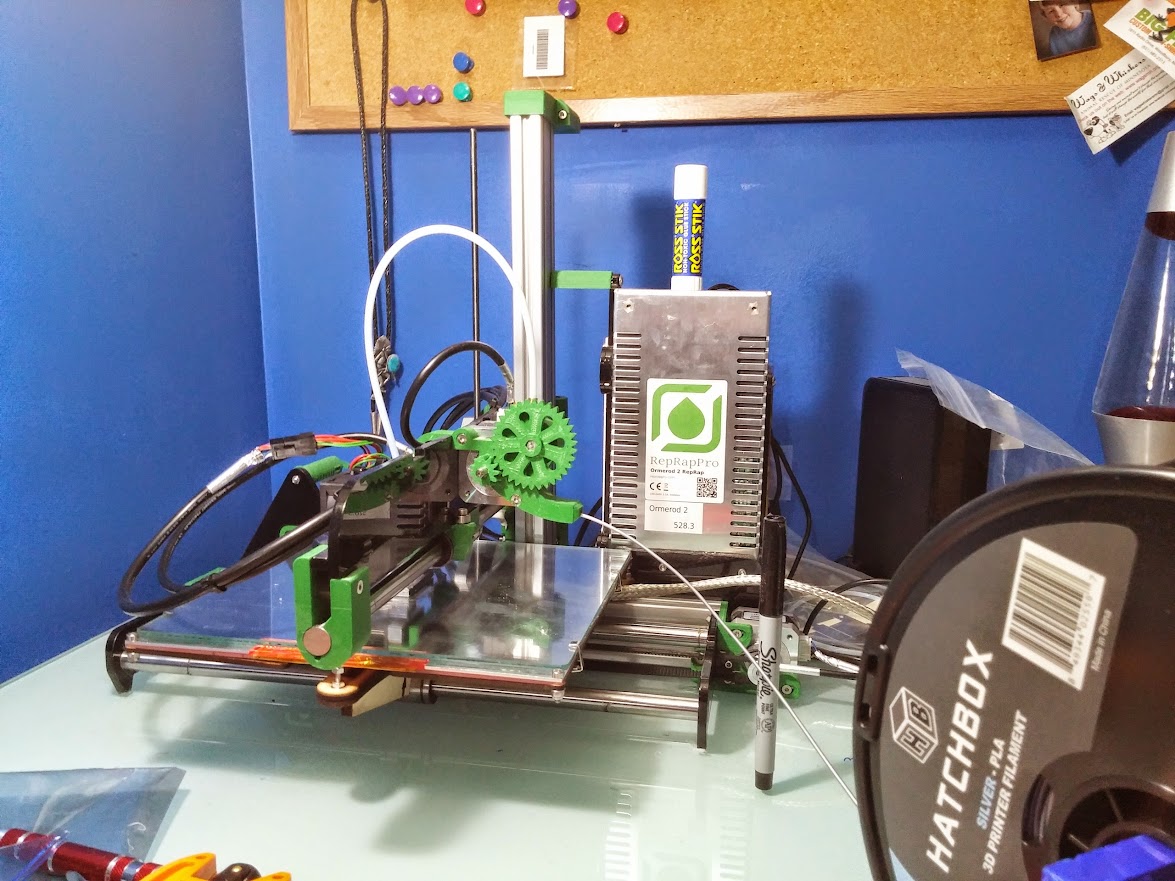
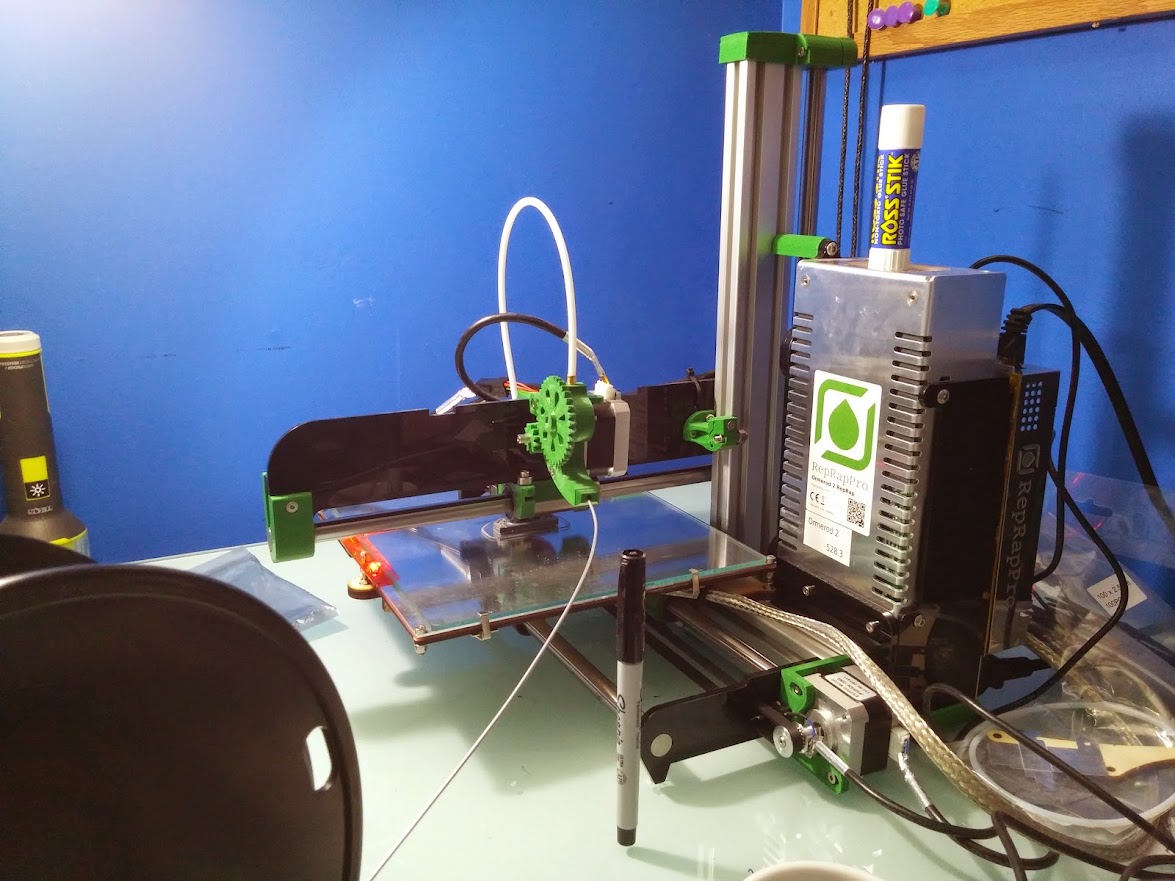
Meet The Printer
Problems I Encountered
I experienced a few issues while assembling the printer, I'll briefly describe each one, and how I (or RepRapPro support) resolved them.Printed Part Issues
I did run into some issues with the printed parts provided with the kit. The most major one was a few warped parts (which can be a fairly common problem in 3D printing). For the most part, this actually didn't cause any issues, the printer seems well enough designed that many of the printed parts could be slightly warped without causing any major issues (and parts that really matter are not printed). However, this isn't really the case for Z-lower mount.
The Z-lower mount I received was severely warped, this part has some very long countersunk holes for screws to mount it on the Y aluminum extrusion. The warping caused these countersunk holes to be far too small for the screws that were supposed to fit down them. I wound up needing to drill them out some to make them work, it was also a little finicky to actually mount onto the aluminum extrusion. A cable tie hole didn't print right either, leaving me no convenient way to tie off cables at the base of the Z tower.
I was able to make it work, and thus did not actually contact support, but I believe they would have sent me a new one if I'd contacted them about it.
I also had an issue with the Y-idler end cracking (picture below). The Y-idler mounts the acrylic piece holding the bars the table rides along onto the aluminum extrusion, it also holds a bearing that the Y-belt wraps around. This crack doesn't seem to have affected the parts ability to hold things together, and it'll be included in a full set of replacement parts I intend to print soon. I never contacted support about it since it seems to be working fine, but I believe they would have provided a replacement printed part if I'd needed it.
The Z-motor brace also looked like it had a print defect (see picture below) but the part seems to have worked fine thus far, and again it will be in the spare parts set I'll print soon.
The Z-lower mount I received was severely warped, this part has some very long countersunk holes for screws to mount it on the Y aluminum extrusion. The warping caused these countersunk holes to be far too small for the screws that were supposed to fit down them. I wound up needing to drill them out some to make them work, it was also a little finicky to actually mount onto the aluminum extrusion. A cable tie hole didn't print right either, leaving me no convenient way to tie off cables at the base of the Z tower.
I was able to make it work, and thus did not actually contact support, but I believe they would have sent me a new one if I'd contacted them about it.
I also had an issue with the Y-idler end cracking (picture below). The Y-idler mounts the acrylic piece holding the bars the table rides along onto the aluminum extrusion, it also holds a bearing that the Y-belt wraps around. This crack doesn't seem to have affected the parts ability to hold things together, and it'll be included in a full set of replacement parts I intend to print soon. I never contacted support about it since it seems to be working fine, but I believe they would have provided a replacement printed part if I'd needed it.
 |
| This printed Y-idler Delaminated as Soon as the CounterSunk Screw on the bottom was screwed in. And the Top looks well on its way. Fortunately this doesn't appear to affect the printers function. |
 |
| The Z-motor brace I received, seemed to have a defective screw hole. However it worked fine during assembly and hasn't impacted the printers performance thus far. |
Brass nut
This one is all RepRapPro's fault. Some of their hot ends (the quick set type) use a different size thread on the inside of their tapered brass nuts. At some point the M5 threaded nuts (the correct one for the Ormerod 2 at this point in time) got mixed up with some M4 threaded ones. The kit I got sent had the wrong M4 size in it.
Support was easy to deal with and sent me a replacement, also allowing me to add anything I wanted to buy to the shipment to get the stuff shipped for free. Of course the stuff was sent standard royal mail 'airmail' class, so it took about 1.5 weeks to show up here in the US.
The mistake on RepRapPro's end is somewhat understandable, the two nuts side by side are almost impossible to tell apart, until you try to screw it onto the nozzle.
 |
| The correct M5 tapered nut installed on the hot end |
Bearing confusion, 9mm vs 10mm
The Ormerod 2 Printer design uses a number of small roller bearings in a variety of places. However, the printer uses two sizes, 9mm and 10mm diameter. This isn't something you'll realize until you get further on in the assembly. At some point I wound up putting a 9mm where a 10mm bearing should have gone. At the very end of assembly I was a 9mm bearing short with a 10mm leftover.....
This resulted in a short hunt around the printer with a caliper, while consulting directions, to determine where the mistake was made.
It wasn't a big issue, to fix, although at the time it was very frustrating. Nevertheless, it's something the directions could've warned me about the first time a bearing was encountered.
Wrong hot end when I ordered a second one
On the warranty shipment for the above brass nut, I decided to order a second hot end with the 0.3mm nozzle in order to get free shipping on it. While it is possible to disassemble the hot end to swap out the nozzle, it's much easier to simply have another hot end with a different nozzle size, you simply have to loosen a couple of screws and put in the other hot end, and tighten a couple of screws.
However, I was sent the hot end kit for a different printer that RepRapPro makes, the Huxley in a 0.5mm tip no less. As you can see below, the bag is very clearly labeled 'Huxley Hot End'. I'm not entirely sure how this happened, but I contacted support, and they were more than happy to send me the 3 parts that are different between the two hotends, the Heating Cartridge, the Fan, and an Acrylic Fan Spacer, and the 0.3 nozzle.
Fortunately these weren't parts I needed to get the printer working, but it was still an inconvenience and it takes time for things to be shipped from the UK to the US.
Tight fit for cartridge in heating block
When putting the heating cartridge into the heating block, it was a very tight fit. This is as you might expect, because you want to get good thermal conductivity between the heater, the block, and the nozzle; otherwise your filament will not melt properly and printer performance will be subpar.
However, in my case the cartridge wound up getting stuck in the hot end. After a quick post to the RepRap forum, a RepRapPro support member suggested that I try using an M5 bolt from the other side to lightly tap the cartridge out. This worked very well, and the cartridge popped right out. The cartridge didn't appear to have any lumps or deformations on it that would explain why it got stuck; and the hole in the block looked smooth as well.

At this point in time I didn't have a 5 mm metric drill bit (the hole size is supposed to be 5mm for the heating cartridge). But I did have 2 US drill bits that are very close to 5mm, one is ~4.978mm, and the other is ~5.054mm. The smaller bit fit very tightly through the hole, but wouldn't remove any material, so I decided to risk using the larger drill bit. In the end, that removed enough material to make the heating cartridge fit very loosely, and I became concerned that the cartridge could fall out. Which would ruin any print in progress, risk melting printed parts on the printer near the hot end, and be a possible safety hazard. Fortunately, the heating block used in the huxley is the same so I used the part from the wrong kit (above) and the hole was the correct size.
It's possible to maybe make the bad heater block work. A small hole could be tapped into the side where a set screw (called a grub screw in the UK), the screw could hold the heater in place. Some hot end designs use this, and it should work adequately. Other people on the forums have suggested using copper paste, the solvents would (in theory) burn off the first time the hot end was powered up (although these may potentially be toxic), this might work, but if for any reason the heater needed to be changed a new heater block would be required. I personally would use the grub screw method if necessary.
The takeaway here is that if building a metric printer, you absolutely need to get metric drill bits. However, in the United States it can be very hard to find anywhere that carries metric bits because these other ones are 'close enough'. Amazon seems to carry quite a few, although some of the reviews make the quality of them questionable. I did eventually find McMaster Carr, a sort of online hardware store, sells them individually or in small sets. I bought a set of 1-7mm in 0.5mm increments, general purpose bits. It cost around $40 with shipping, but I believe these are a necessity when working with a printer where all the dimensions are metric.
Surprisingly, RepRapPro gave me a replacement heater block free of charge (I asked for one to buy, but they just added it as a warranty item), with the other hot end parts they had to ship me, so I won't have to resort to the grub screw method for my second hot end.
Short screws for PSU through 2 layers of acrylic 10mm had to get a 12mm
The power supply has a few acrylic pieces that are part of what mounts it to the duet and the entire printer. On one side there are two stacked pieces, so the acrylic is a little bit thicker. This resulted in the 10mm screws supplied being too short, so I had to go out and buy a couple of 12mm screws.
Seems a bit odd that the kit wouldn't use longer screws to go through thicker material....
Seems a bit odd that the kit wouldn't use longer screws to go through thicker material....
 |
| As you can see, the black acrylic is twice as thick on the left compared to the right. But RepRapPro provides the same length screw for both sides. |
hex standoff threads out of spec on one of them, had to superglue it in.
At the bottom of the power supply, there is another piece of acrylic. 3 Hex standoffs are supposed to self tap into holes on this acrylic part. However, one of the standoffs threads was too small, it simply slid into the hole.
After a long search around for a new one (I even went to McMaster Carr) it appears that the dimensions of these standoffs are highly customized (or at least customised to the point of not being available in the USA). In the end I had to use Cyanoacrylate (superglue) to get it stuck in the acrylic plate. This worked fine, and honestly the superglued one might be held in the acrylic better than the other two.
Still, I am somewhat concerned about not being able to get another one of these anywhere. The entire concept of a RepRap Printer is to make all the parts easy (or at least possible) to self source. Obviously you're not self sourcing all of the parts to build the printer since you got a kit (although the Ormerod 2 Plans are open source and you could in theory do that), it's always nice to know that replacement parts are easy to find.
I have the concern that if I ever needed one of these hex standoffs replaced..... I'd have to go through the hassle of getting them from RepRapPro. or going through the expense of having a local machine shop fabricate it.
In the Ormerod 2, there is only a small nut used as a spacer. The result is an excessive amount of test fitting the duet on the enclosure and cutting off pieces of solder that are sticking out to ensure there is not a short. The directions mention that you can put Kapton tape on the enclosure bottom to make it non-conductive. I did 2 layers of this tape to be extra sure, and I was not very confidant that I trimmed the pins sufficiently.... and this could be a very expensive mistake!
My question is this, why couldn't the enclosure use hex standoffs and give the board more clearance? Sure, the duet enclosure would be a bit taller, but it's at the back of the printer, it wouldn't be in the way of anything.
Another alternative would be to make the enclosure printed (as with the Ormerod 1), but that could be considered a step down in quality, and having to mess around with filling out every hole for every wire that connects to the board would quickly become a pain; but it by no means impossible.
It's just one thing about the design that really bugs me. I suppose it also bugs me some because someone on the forums had an issue, that was the result of solder shorting out on the enclosure, proving that it's not just my crazy imagination.
After a long search around for a new one (I even went to McMaster Carr) it appears that the dimensions of these standoffs are highly customized (or at least customised to the point of not being available in the USA). In the end I had to use Cyanoacrylate (superglue) to get it stuck in the acrylic plate. This worked fine, and honestly the superglued one might be held in the acrylic better than the other two.
 |
| The Troublesome Hex Standoff, The threads on the right are slightly too small to self tap into the acrylic kit parts |
Still, I am somewhat concerned about not being able to get another one of these anywhere. The entire concept of a RepRap Printer is to make all the parts easy (or at least possible) to self source. Obviously you're not self sourcing all of the parts to build the printer since you got a kit (although the Ormerod 2 Plans are open source and you could in theory do that), it's always nice to know that replacement parts are easy to find.
I have the concern that if I ever needed one of these hex standoffs replaced..... I'd have to go through the hassle of getting them from RepRapPro. or going through the expense of having a local machine shop fabricate it.
How the Duet circuit board is mounted.
The Duet PCB (Printed Circuit Board) is mounted on top of a metal enclosure. To me this seems, like maybe not the best idea, or at least poorly executed.
The PCB (like all PCB boards) has some solder underneath the board. In the desktop computers I've worked with, there are hex standoffs underneath the motherboard that ensure there is a substantial amount of clearance between this solder and the mettle case.
The PCB (like all PCB boards) has some solder underneath the board. In the desktop computers I've worked with, there are hex standoffs underneath the motherboard that ensure there is a substantial amount of clearance between this solder and the mettle case.
In the Ormerod 2, there is only a small nut used as a spacer. The result is an excessive amount of test fitting the duet on the enclosure and cutting off pieces of solder that are sticking out to ensure there is not a short. The directions mention that you can put Kapton tape on the enclosure bottom to make it non-conductive. I did 2 layers of this tape to be extra sure, and I was not very confidant that I trimmed the pins sufficiently.... and this could be a very expensive mistake!
My question is this, why couldn't the enclosure use hex standoffs and give the board more clearance? Sure, the duet enclosure would be a bit taller, but it's at the back of the printer, it wouldn't be in the way of anything.
Another alternative would be to make the enclosure printed (as with the Ormerod 1), but that could be considered a step down in quality, and having to mess around with filling out every hole for every wire that connects to the board would quickly become a pain; but it by no means impossible.
It's just one thing about the design that really bugs me. I suppose it also bugs me some because someone on the forums had an issue, that was the result of solder shorting out on the enclosure, proving that it's not just my crazy imagination.
Typo in Mounting Duet Enclosure to the Aluminum Extrusion
There's a small typo in the directions for mounting the duet to the aluminum extrusion. They list two M4x50mm button head screws, however you only use one. It's a small mistake, but if you're grabbing all the needed screws and parts before you start each step. It can be frustrating not being able to find two of these screws, since the kit only comes with one, the number needed.
To be perfectly honest, I'm surprised that I only found one typo, and a minor one at that. The Ormerod printer has undergone a significant number of revisions, from the Ormerod 1 to the current Ormerod 2 version 4 (528.4). So the original directions have been updated with each revision.
To be perfectly honest, I'm surprised that I only found one typo, and a minor one at that. The Ormerod printer has undergone a significant number of revisions, from the Ormerod 1 to the current Ormerod 2 version 4 (528.4). So the original directions have been updated with each revision.
Bad Duet
After getting the entire printer finally assembled, and all the wires plugged in, the X axis wouldn't move.(If you're troubleshooting a stepper driver issue, never unplug a motor with the duet powered up, it will destroy the stepper driver chip It's best to have the duet unplugged from the wall and USB when doing any wiring). After trying various combinations of cables and different stepper drivers, it was clear the something was wrong with the duet.
Below is a picture of the X axis stepper driver (labeled U5 on the duet schematics). The right side of the chip looks fine, but you can see solder is shorting out many or all of the pins on the left side of the chip.

I contacted support after I'd done the troubleshooting of swapping cables around, and figured out that the problem was within the stepper driver on the board. I also posted everything on the RepRap Ormerod Forums They came back wanting a picture of the duet board in that location, and the above picture is what I sent back. They then sent me a new board, although they didn't have any in stock till the next week. I also paid an additional $25 to have it sent UPS and not standard post which takes a couple of weeks; I only had to pay the difference between the two shipping methods.
However, this lead to a UPS experience I can only describe as a farce. First, UPS picked up the package and then kept it in their Bristol location for eight days, tracking info claimed the value of the shipment was missing; I reported this to RepRapPro shortly after I noticed it, and then a few days after that when it was still showing this. At the time I wasn't sure where the issue was, but now I'm certain it was with UPS.
Then once UPS finally decided to ship the package, when they brought the package to me they tried to charge me over $120 to accept the package. The UPS drivers handheld computer offered no explanation, other than to call UPS's 1-800 support number with questions. I called their support while the driver was there and was directed to send the package back with him, without paying, until we could get this resolved. It was then a huge customer support mess, and it took about 3 business days to track down someone in UPS who could actually fix the issue.
Apparently somehow UPS got the invoice for the original printer order mixed up with the warranty order (I should point out that 3 copies of the correct invoice were attached to the box in the customs envelope, for whatever reason UPS never opened this when the 'value' was missing). I should also point out that every invoice from RepRapPro had the UPS tracking number printed on it.
So, why did UPS take an invoice with a different tracking number (and a shipment date over a month ago) and try to attach it to this package?
Also, the majority of the charges were warehouse fees, ($20/day+$0.20/day/pound, 2 days free) so over $120 right there. Because they decided to hang onto the package for 8 days, because they didn't know how to handle paperwork right.
At the end of the day, UPS is entirely at fault for the incident, and their customer support was horrible. I have to give credit to RepRapPro who tired to resolve the issue from their end (only to have UPS never call them back, until the 11th hour when the package was about to be returned to sender), and RepRapPro refunded me the $25 I paid for UPS shipping. I must also congratulate the UPS driver, who tried to get the issue resolved from his end, and was very helpful, friendly, and courteous through the ordeal.
RepRapPro also wanted the old board sent back for analysis once I got the printer up and running with the old one, which is apparently standard practice for them so they can improve the production methods (or start asking the PCB maker questions). They reimbursed me for the cost of returning the board to them (specifying that the slowest shipping method would be fine).
Z probe
I also ran into an issue with the Z probe. The duet would only return 0 (1023) no matter what was in front of it. There is a whole section of tests to run to figure out where the problem is, but to sum it up, the cable I received for the Z-probe had a couple of wires reversed. The correct order is Red-Yellow-Blue-Green. It's simple enough to swap the wires around, and it doesn't appear to have damaged the Z sensor board.
 |
| This connector has the green and yellow wires reversed, It's simple to change them, just lift the plastic tabs above the square slightly and pull the wire out, and then plug it into the correct location. |
Extruder jam when fed filament
When testing the Extruder Drive I had an issue where it wouldn't feed filament if it didn't have the 'indentations' from the hobbed bolt already present. I traced this to the small extruder gear being too close to the extruder drive body, so the gear was dragging; Pulling the gear up slightly solved this issue. A small problem with a simple solution.Conclusion
At the end of the day, the Ormerod 2 seems like a good printer, it has a few flaws but the community has come up with solutions for most of them, and is always working to further improve it.RepRapPro I have some mixed feelings about. First off, they honor their warranty, and work with me a lot to get the printer working. Most of the delays were caused by shipping, and I suppose that's what I get for buying a RepRap kit from the UK. However, there does seem to be some QC issues with the duet, wiring looms, and the printed parts. It may be that my experience is not representative of what most people go through. I do know that I caught the company at a particularly busy time, with a bunch of new 2 color upgrades shipping out for current Ormerod 1 and 2 owners, and interest in printers reaching an all new high point.
I can't say I would or wouldn't recommend RepRapPro to a friend. I've had no real experience with other RepRap kit providers (aside from horror stores from other forum and IRC members), so I have nothing to compare them to. I can say this, that although you might have a lot of trouble with their kits, They'll help you to get it working eventually.
That said, RepRapPro is one of the only kit companies I know of that uses the Duet Electronics which have a very nice web interface (although I'd recommend using DC42's firmware (here) and Zombie Pants LOL's web interface (here), these community forks of the RepRapPro version offer many new features and bug fixes). But if you wanted to use the Duet with a different printer you can just buy the duet from RepRapPro or Think Print 3D, DC42's firmware added support for delta printers, and is currently working on adding CoreXY support. So if you know enough about your printers design and some electronics feel free to consider adding a Duet to your build.
If you'd like to learn more about the Duet, here is a link to the Duet wiki article
Well that's all for now, I plan to start posting more regular now that my printer is up and running.
No comments:
Post a Comment